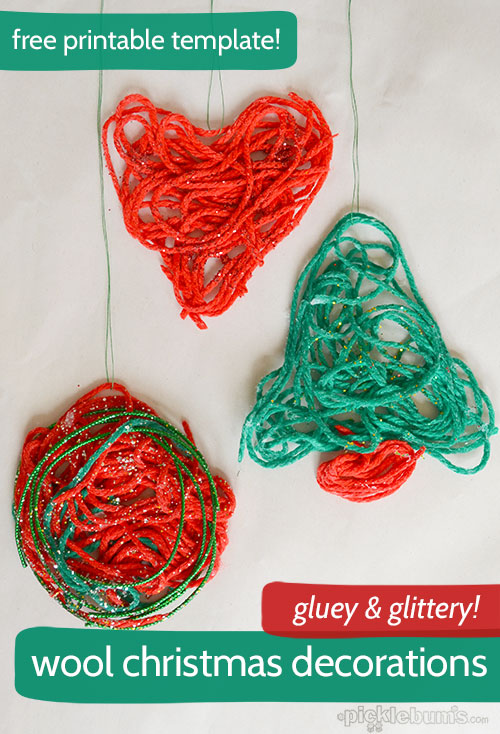
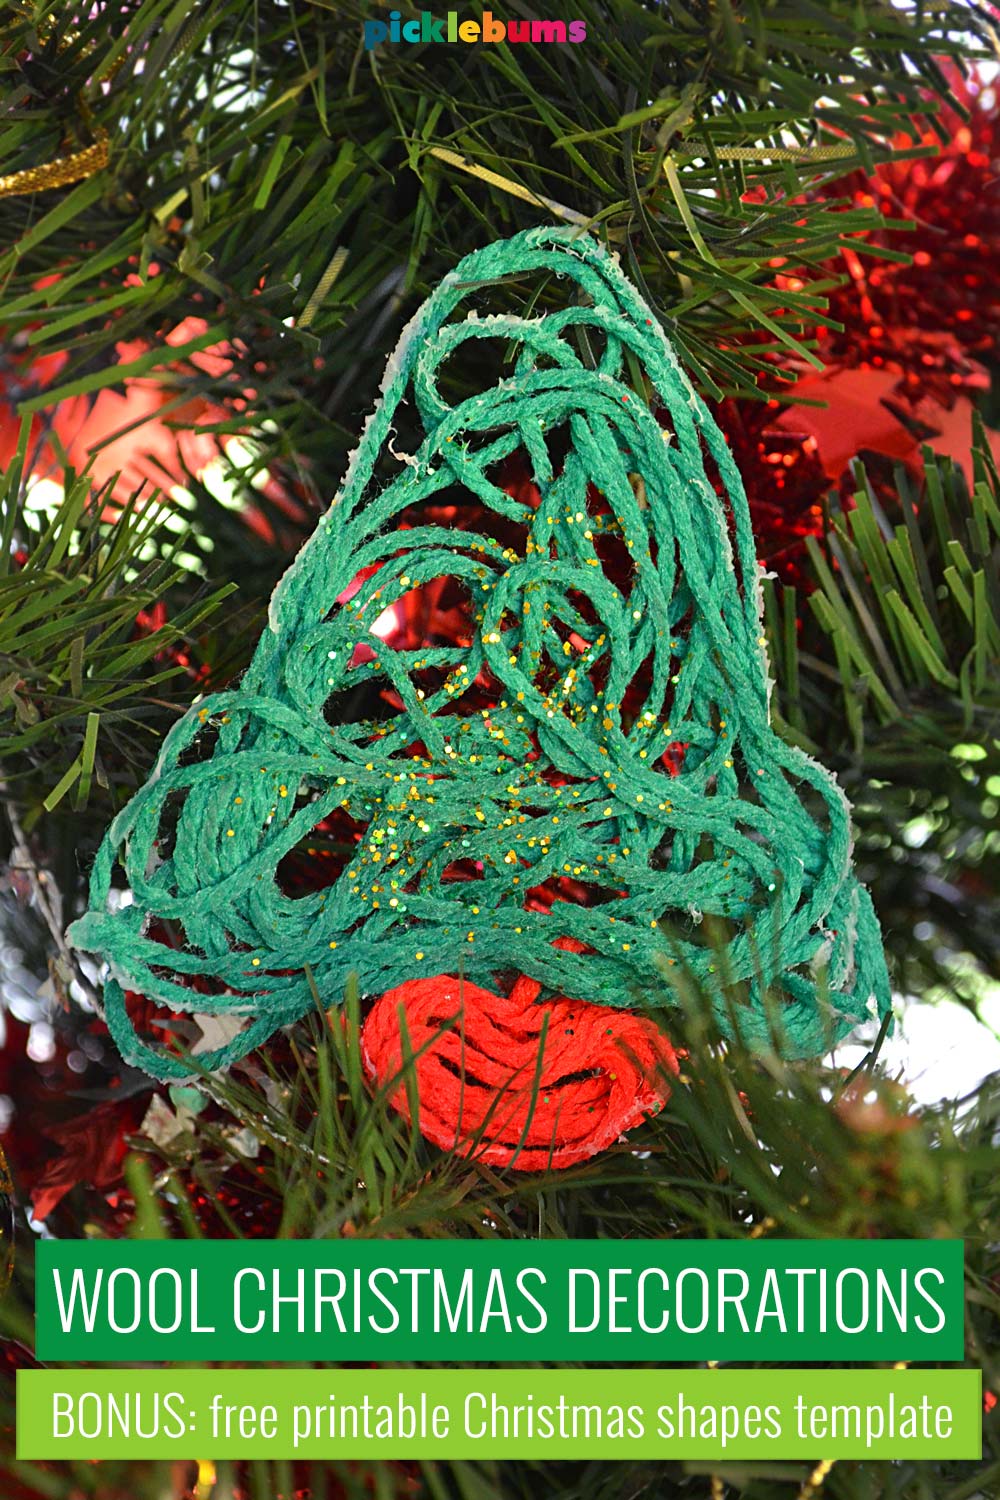
These kid-made wool Christmas decorations are so much fun to make, and will look gorgeous hung on your Christmas tree!
Use our free printable Christmas shapes template to make these glue and wool Christmas ornaments. This is an (but a bit messy) Christmas craft for kids, that everyone will love!
Our Christmas tree is not stylish.
It is not perfectly decorated, it doesn’t have a matching colour scheme, or a theme.
Our Christmas tree is a bit chaotic and messy, but it is a perfect reflection of our family!
Our Christmas tree is always decorated in lots of different ornaments and full of kid-made decorations, and we love it.
Every year my kids make more Christmas decorations to add to our crazy Christmas tree and this we we made some sticky, gluey, glittery, wool Christmas decorations!
How to Make Wool Christmas Decorations with your Kids.
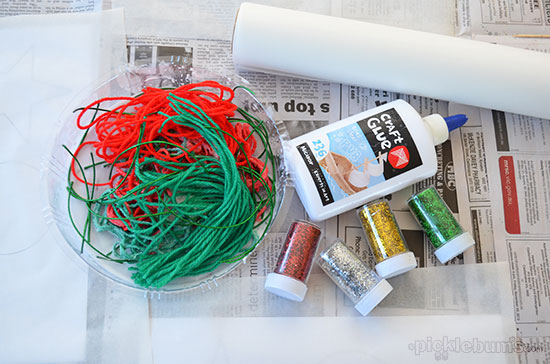
To make some gluey wool decorations you’ll need:
- Something to cover your work surface – this will be messy!
- Some damp cloths or wipes for sticky fingers
- art smocks, aprons or old clothes.
- Wool or string in a couple of colours – we used red and green.
- PVA/White glue watered down a little – lots of it!
- A container to put your gluey wool in
- Non-stick baking paper (or cling wrap)
- Free printable shape template (download below) or paper with your own shapes drawn on it
- Glitter (optional)
Before you begin creating, make sure to cover your work surface, because this Christmas craft is quite messy!
We used newspaper for this so that we could just throw it away as I knew it would get pretty gluey and very glittery We also put a container of damp wash cloths in the middle of the table for wiping sticky and glittery fingers, and made sure everyone was wearing an apron, or old clothes.
We used four simple Christmas shapes as templates to make our wool Christmas decorations – a start, a circle, a heart, and a Christmas tree (see below to download the free printable template).
You could also draw your own shapes to use as a template, just make sure to keep them large and simple, and use a thick, dark coloured marker so you can easily see the lines.
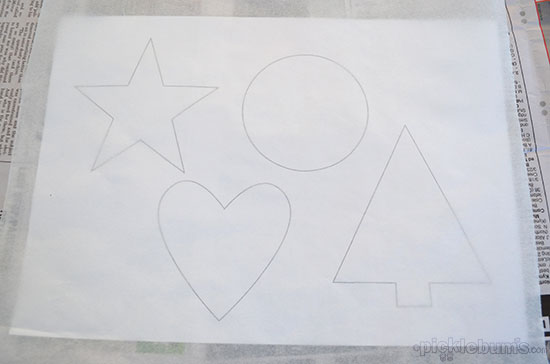
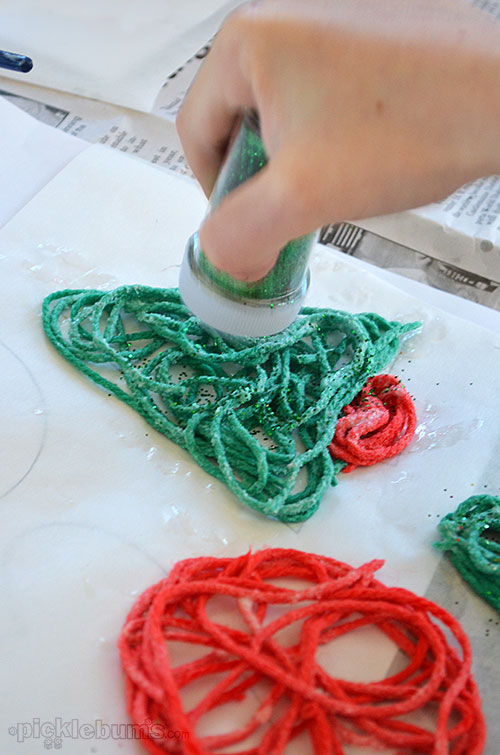
Set your template on the table and cover it with a sheet of non-stick baking paper. Make sure you use non-stick paper or you’ll never be able to get the decorations off when they are dry! Now it’s time to get gluey!
Cut your wool into lengths of about 5-12cms and put them into a container. Totally saturate the wool with watered down PVA (white craft or wood glue that dries clear). You’ll need lots of glue and you need to make sure that every strand of wool is really really gluey.
Once everything is well and truly gluey, pick a shape to start with, grab a piece of gluey wool, and carefully place it on top of the shape, molding it to follow the outline.
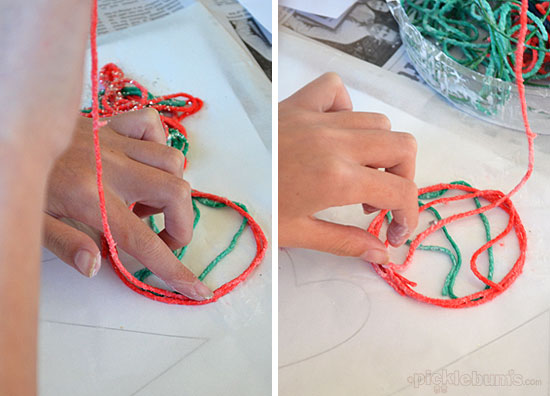
Make sure the outline of your shape is quite thick, you will probably need more than one piece of wool to get a nice strong outline. Then you can start filling in your shape however you like. Make sure any piece of wool you add to the shape touches the wooly edge of your shape and sticks to it well so it all holds together when it is dry. Make sure all your pieces of wool are very very gluey, add more glue to the container of wool as you go if needed.
Once you have enough gluey wool on your shape, sprinkle a little glitter over it, or a lot! (Glitter drives me nuts, but it’s Christmas so I let me kids go for it with the glitter!).
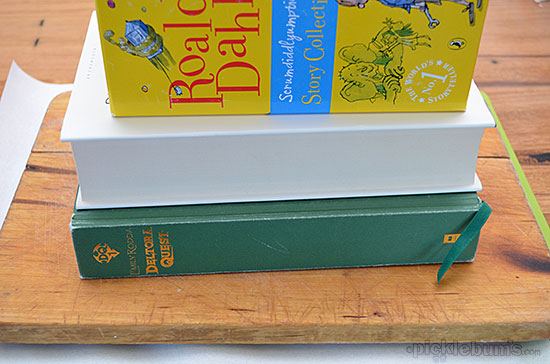
Put your gluey shapes, on their non-stick paper on a flat surface, cover the top with another piece of non-stick baking paper, and put something flat and heavy on top of that to press them down. Leave them to flatten for an hour or two, then you can take off heavy things and set them aside to dry.
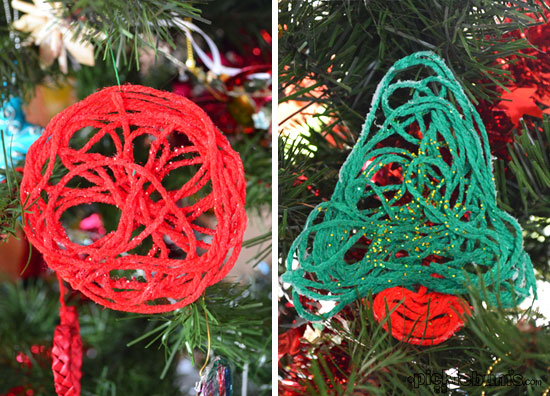
It will take a few days for the glue to completely dry, but when everything is dry and done you can carefully peel your shapes off the non-stick paper, add a string, and they are ready to hang on your tree!
Free Printable Christmas Shape Templates.
We made a simple, free printable, Christmas shape template to use to make these wool Christmas decorations. There is a star, a circle, a Christmas tree and a heart.
This printable is an A4 sized pdf file, you will need a pdf reader such as adobe acrobat to open it. It will fit to print on US ‘letter sized’ paper, just be sure to select ‘fit’ or ‘shrink to fit’ from your printer options to allow for printer margins.
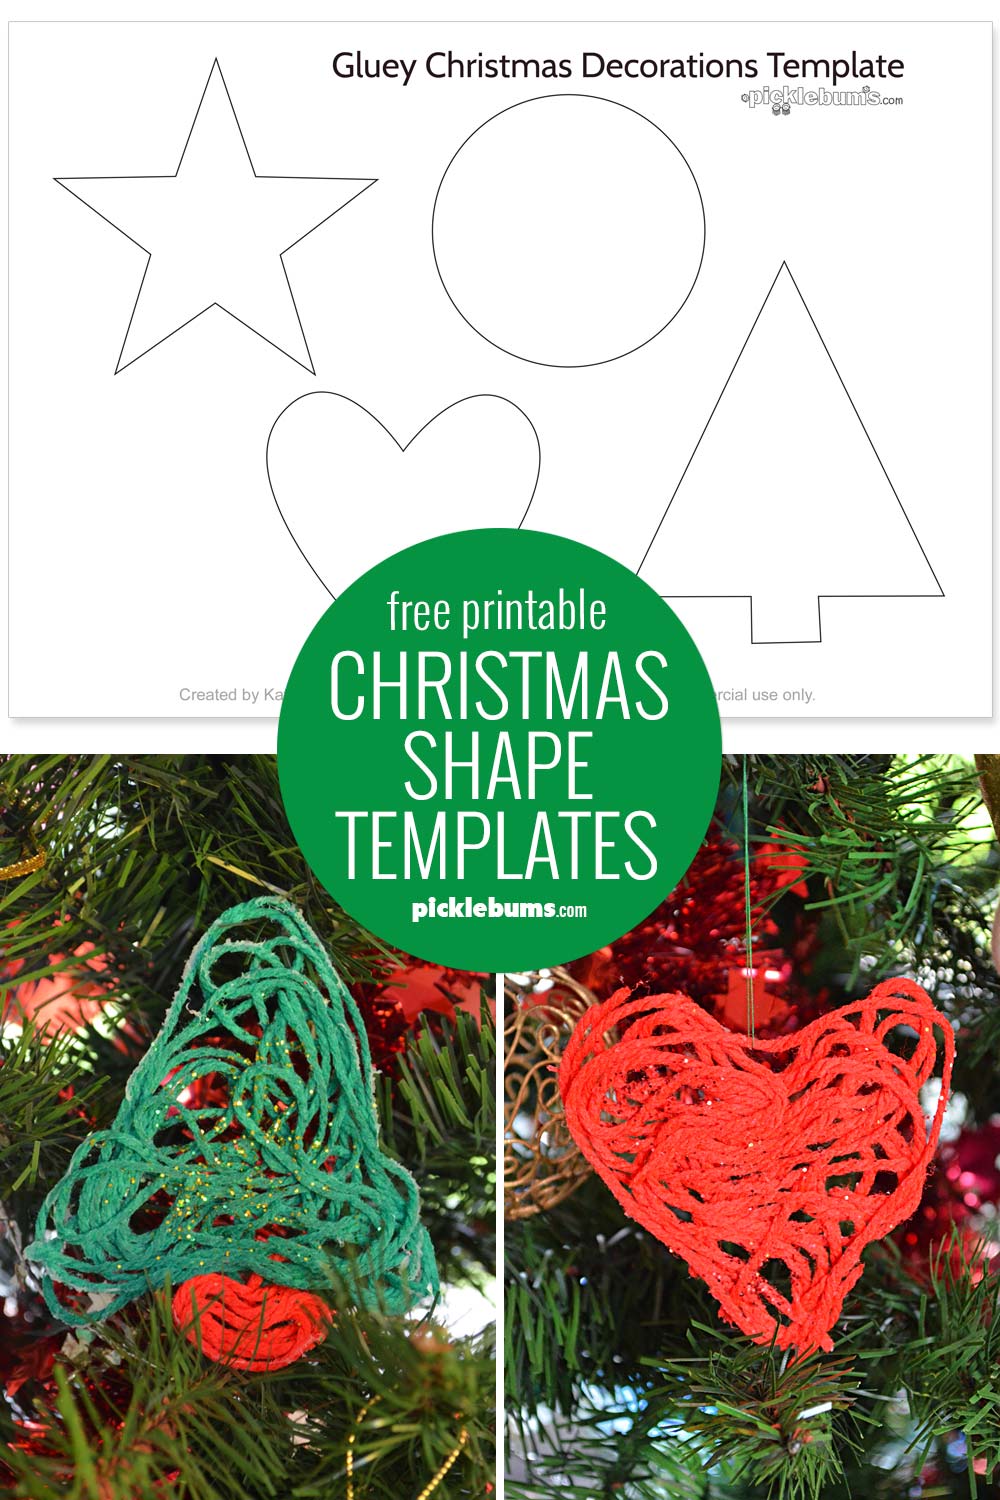
Click here to download the Christmas shape templates.
Please remember that the printables at picklebums.com are for personal use only, you may not sell, share, or link directly to these files.
Why you should fill your Christmas tree with kid-made ornaments!
Ditch the idea of a perfect Christmas tree and embrace the chaos by decorating your tree with lots of kid-made Christmas ornaments!
Making Christmas ornaments is a great way for kids to work on so many different developmental skills, and a fun and easy way for them to get into the holiday spirit! Your kids will be bursting with pride when they see you hanging their handmade ornaments on the tree year after year, and as your kids get older you will be so glad you made those memories.
There are so many fun ornaments you can make too!
Older kids will love making these melted crayon Christmas ornaments, and even little kids can help make these easy Christmas star decorations, or these foil Christmas decorations.
Use our free printable temples to make these paper cone decorations, or these star and circle paper decorations. Or check out this huge list of Christmas decorations kids can make.
I know a perfectly decorated, themed, Christmas tree looks amazing… but there is nothing better than a tree full of memories made by your kids!
More Easy Christmas Crafts for Kids
If your kids love Christmas crafts they’ll love these easy Christmas craft activities :
lol thanks for the warning!!! I’m afraid that won’t deter us, we love messy & these are definitely awesome
Our Christmas tree is much the same; filled with all kinds of eclectic ornaments collected and received over the years. I love it. I adore Christmas decorations and can’t help picking a new one up every time we go somewhere. They are a bit like tourist T-shirts for me ;)
I never thought I’d allow kid-made decorations on my tree, but having kids changed that idea. Kid-made decorations are the best.
This is a great idea. We tried to make a gluey wool basket a few weeks ago. It didn’t turn out and we ended up disposing of it. It actually would have made a nice decoration.
These turned out lovely Kate. And so simple!
Love the warning as many parents struggle with the mess arts and crafts create but I really believe they are so very essential to development, imagination and simple play fun.
Oh we love messy glitter crafts! This looks like a good one :-)
This is a great idea Kate! I love how they turned out, so funky and colorful! Pinned :)
These look so great Kate. I haven’t seen this idea before.
That is wonderful that your tree evokes so many memories. That is one of my favourite things about Christmas – pulling out all of the decorations and remembering the stories and memories associated with each piece. Next year, your children will have more memories as they recall the fun they had making these lovely and vibrant gluey decorations.
Glitter: I’m all over it. And er… it’s usually all over me (and everything) at the end. But hey, it’s FUN!!
Thanks, this looks like one I’ll have to add to the growing list.
Always looking for crafts to do with grandkids. This will be fun for the little ones as well as the older ones. Our tree has all sorts of handmade decorations from when the girls were little. Can’t wait to give it a try.
I was wondering if I could use an extra large cookie cutter for the template. I want to do this activity with my granddaughters and I’m not sure the can do the outlining of the shape, but filling in the middle will be so much fun for them.
I think that would work just fine and be great for little hands. You might want to grease the cookie cutter though so it is easy to get the wool out once it is dry.
Fortunately for us in the Southern hemisphere Christmas is in our summer, so all the projects can be done outside so making a mess is not a problem. Glittery lawn is a small price to pay for the hours of crafting.Many thanks for the ideas.
I notice the star template, but no pictures of the star as a finished product. Did that shape not work as well? I am looking for a star ornament for my 3-year olds…This is an adorable craft!
We did make stars, just none of them made it into the photos. But I would say, for a three year old, the star will be a bit tricky. You need to be very precise, and to make the edges of the star very clear otherwise it kinda just looks like a random messy shape.
Made this today at my Pre K Sunday School class. Even the other teachers got into this project. For young children it was easier to use shorter lengths of yarn then longer. Keep lots of paper towel and hand wipes handy, as the young children tend not to like their hands getting so sticky. Otherwise it was a blast to make. Can’t wait to see what they will look like next week when we return.
Oh yes, I couldn’t find the non stick paper in our church’s kitchen so I put the templates in a gallon size Glad plastic bag. Even if it sticks its clear so it won’t be a problem. I covered the tables with a dollar store tablecloth that I had laying around.